29 October 2008

How to Verify Email Address Using PHP

At the previous article, we have already know how to run a PHP mail application in localhost. Now, this tutorial will show you how to verify an email address using PHP, it is in valid format or not. Please note, this article only show how to check the format, not the existence of the URL or the service provider.

To verify an email address format using PHP is easy, PHP has a great function called eregi. This is a part of PHP form validation for other entries to check proper formatted data is entered by the user.

The first step to creating a PHP script for validating an email address is work, it is good to know what characters are allowed and what characters are not allowed in an email address, states that the form of an email address must be of the form "user_account@domain". The "user_account" of an email address must be between 1 and 64 characters in length and may be made up in any one of three ways. It can be made up of a selection of characters (and only these characters) from the following selection:

  • A to Z
  • 0 to 9
  • !
  • #
  • $
  • %
  • &
  • '
  • *
  • +
  • -
  • /
  • =
  • ?
  • ^
  • _
  • `
  • {
  • }
  • ~
  • .

The "domain" of the email address can also be made up in different ways. The most common form is a domain name, which is made up of a number of "labels", each separated by a period and between 1 and 63 characters in length. Labels may contain letters, digits and hyphens, however must not begin or end with a hyphen (officially, a label must begin with a letter, not a digit, however many domain names have been registered beginning with digits so for the purposes of validation we will assume that digits are allowed at the start of domain names). A domain name, technically, need be only one label.

When you register on at a website, the site normally checks if the e-mail address that you enter is in a valid format. This is done by using what called a Regular Expression. What we need to do is check if a string matches the regular expression.

This example is using ereg function with the regular expression:


<form method=post action=<?php $_SERVER['PHP_SELF']; ?>>
Your email : <input name="email" type="text">
<input type="submit" name="check" value="Check E-Mail">
</form>

<?php>
if ($_POST[check]);
{
$valid_mail = "^([._a-z0-9-]+[._a-z0-9-]*)@(([a-z0-9-]+\.)*([a-z0-9]+)(\.[a-z]{2,3}))$"; //regular expression
if (!eregi($valid_mail,$email))
{
echo "Your email address is NOT VALID";
}
else
{
echo "Your email address is valid";
}
}
?>


Now, You can validate email addresses entered into your site.
Good Luck


References:
Lukmanul Hakim, Loko Media
http://www.addedbytes.com/
http://www.codewalkers.com/
http://www.plus2net.com/

28 October 2008

How to Run PHP Mail Application in Your Local Computer

As a web programmer, sometimes you need to test an application that correlate with email. During the time, this application must be online, because it can't run in your local computer or localhost, even you have already setup your local computer as a web server.

Fortunately, there are some software can help you to run an application that correlate with email in your local computer. One of them is ArGoSoft Mail Server (agsmail.exe), a little size freeware. You can download at http://www.argosoft.com/rootpages/download.aspx

To setup the Argosoft Mail Server, just follow these simple steps:

  • Install the Argosoft Mail Server in your local computer. If done restart your computer
  • Run the Argosoft Mail Server
  • At Tools menu, choose Option and click on it
  • Type “localhost” in the textbox, click the Add button and then click OK
  • Now, at Tools menu, choose User and click on it
  • Click the “Add New User” button
  • In User Properties window, fill the User Name, your Real Name, Password, and Confirm your Password, for example: nopomawon, Yanis Rizaldi, secret, secret.
  • Click OK if you’re done. Now, you already have an email address: nopomawon@localhost

Test it with a simple PHP application.
Now is time to test your localhost mail server. PHP has a function that can be used to send an email, it’s easy to understand and the syntax is pretty simple:

mail(recipient, subject, message, additional header)


Let’s create a simple script to test your localhost mail server. Make sure the ArGoSoft Mail Server is active.

$recepient = “nopomawon@localhost”;
$subject = “Test an email”;
$message = “Test my localhost mail server”;
$from = “replay-to:
someone@domain.com”;

$send_mail = mail($recepient, $subject, $message, $from);

If ($send_mail)
{
Echo “successfully send email”;
}
Else
{
Echo “Oops!, can’t send the email”;
}


Run the scrip. If success, you can see the mail using Microsoft Outlook or Outlook Express. Of course, you must setup the mail program as same as ArGoSoft’s User Properties.
Display Name : Yanis Rizaldi
E-mail addres : nopomawon@localhost
Account name : nopomawon
Password : secret

That’s all, just try and have some fun

Good luck

20 October 2008

SQL Server - Create Computed Column using User Defined Functions (UDFs)

User defined functions (UDFs) are small programs that you can write to perform an operation. Adding functions to the Transact SQL language has solved many code reuse issues and provided greater flexibility when programming SQL queries.

According to SQL Server Books Online, User defined functions (UDFs) in SQL Server 2000 can accept anywhere from 0 to 1024 parameters.

User defined functions (UDFs) are either scalar-valued or table-valued. Functions are scalar-valued if the RETURNS clause specified one of the scalar data types. Functions are table-valued if the RETURNS clause specified TABLE.

There are number of reasons to use user defined functions (UDFs), but this time I will share about the uses of scalar function to create a computed column. Scalar functions can be used to compute column values in table definitions. Arguments to computed column functions must be table columns, constants, or built-in functions. This example shows a table that uses a Volume function to compute the volume of a box:


-- Create function statement
CREATE FUNCTION BoxVolume
(
@BoxHeight decimal(4,1),
@BoxLength decimal(4,1),
@BoxWidth decimal(4,1)
)
RETURNS decimal(12,3)
AS
BEGIN
RETURN ( @BoxLength * @BoxWidth * @BoxHeight )
END
GO


-- Create table statement
CREATE TABLE [dbo].[BoxTable]
(
[BoxPartNmbr] [int] NOT NULL ,
[BoxColor] [varchar] (20) NULL,
[BoxHeight] [decimal](4, 1) NULL ,
[BoxLength] [decimal](4, 1) NULL ,
[BoxWidth] [decimal](4, 1) NULL ,
[BoxVol] AS ([dbo].[BoxVolume]([BoxHeight], [BoxLength], [BoxWidth]))
) ON [PRIMARY]
GO

-- Insert some data
INSERT INTO BoxTable(BoxPartNmbr,BoxColor,BoxHeight,BoxLength,BoxWidth)
VALUES (1,'RED',2,2,2)
GO
INSERT INTO BoxTable(BoxPartNmbr,BoxColor,BoxHeight,BoxLength,BoxWidth)
VALUES (2,'GREEN',3,3,3)
GO
INSERT INTO BoxTable(BoxPartNmbr,BoxColor,BoxHeight,BoxLength,BoxWidth)
VALUES (3,'BLUE',4,4,4)
GO


You must remember that a computed columns might be excluded from being indexed. An index can be created on the computed column if the user defined function is always returns the same value given the same input (deterministic).

With UDFs, you can more easily accommodate the unique requirements of a custom application. They increase functionality while often reducing your development effort.

14 October 2008

How to Connect to SQL Server 2000 with PHP Using php_mssql.dll

PHP is powerful tool for build up your web applications because PHP is an easy to learn. SQL server is a Microsoft’s robust database product, which can handle terabytes of your data.

In web database application, usually some web programmers use PHP to connect to MySQL database. But in the other side, there are many web programmers looking for information how to connecting PHP to SQL Server 2000.

Well, this time I’ll share about how to connecting PHP to SQL Server using php_mssql.dll.

I use Windows Vista 32 bit for the OS, SQL Server 2000, PHP version 5.2.3 and AppServ version 2.5.9 for Windows for Web Server.

The php_mssql.dll file is already exists in extension or ext directory of your PHP installation folder. Before you can use the php_mssql.dll, you must make a modification in php.ini file, which is placed in C:\Windows directory, or If you’re using php before version 5, the php.ini file is in php installation folder.


  • Open the php.ini file using Notepad or WordPad.
  • In Notepad window, press Ctrl + F to find this word: “extension=php_mssql.dll”.
  • Delete the semicolon mark (;).
  • Save the php.ini file.
  • Restart the web server using "net stop apache" and then "net start apache" from your computer DOS promp. Or maybe you need to restart your computer.
Now, let’s test the php_mssql.dll, it is already run perfectly or not. You can check by using phpinfo() function. Type this address in your browser: http://localhost/phpinfo.php


In the PHP configuration information, you should see something like this:

Now, your Apache web server is ready to make a connection between PHP and SQL Server 2000 using php_mssql.dll.

Create connect.php file. This file is example how to connect PHP to SQL Server 2000.

$host = "rafa-comp"; //set the host with server name or ip address
$user = "sa"; //set the user id
$password =""; //set the user password (blank password is not recomended)
$database = "Northwind"; //set the database to use
if (mssql_connect($host, $user, $password)) {
echo 'Connection to SQL Server success, ';
if (mssql_select_db($database)) {
echo "$database database is selected"; }
else {
echo 'database not found';}
}
else {
echo 'Sorry my bro, connection to SQL Server failed';
}


Save the connect.php file in your web root directory. Run it through your browser. Your browser return should look like this:


OK, I hope this onformation is usefull. Have a nice day :-)


11 October 2008

How To Disable Windows Autorun

Windows auto run facilitate us to access resource be like flash disk easily. But, once in a while windows autorun exactly very dangerous. Sometimes the flash disk that stuck at USB port contain viruses

some kind of viruses directly active when you enter the flash disk into USB port, this matter can happen because of your computer's autorun function is in a state of active / enable. If your computer is provided with anti virus, possibly spreading of viruses from the flash disk to your computer can be avoided.

The following tips is to disable Windows XP autorun function, at least can prevent the viruses that active by exploiting the Windows autorun.

  • Open RUN then type gpedit.msc to open Group Policy
  • Open Computer Configuration - Administrative Templates – System
  • At the setting tab, find the Turn off Autoplay, then double click that words. Choose “Enable
  • At the Turn of Autoplay on, choose All drives
  • Do the same configuration at User Configuration - Administrative Templates – System

Using that way, if there is a virus that exploit the function of windows autorun can be prevented and we can vanish it before groaning.

Good luck :-)

08 October 2008

How To Backup Your Windows Registry

Why you must backup your windows registry ?

Registry Editor is a tool for viewing and changing settings in your system registry, which contains information about how your computer runs. Almost the entire settings are stored in the registry. The Windows system configuration, the computer hardware configuration, information about installed programs, the types of documents that each program can create, and user preferences are all stored in the registry.

Making incorrect changes in the registry can break your system. Unfortunately, it is not possible to backup registry files under Windows NT, 2000, XP, and Vista, while the operating system is running.
So.., it's highly advisable to backup the registry before editing any portion of it.

Registry files can be found in any of the following locations, depending on your system configuration :
C:\Documents and Settings\User Name\ on Windows 2000, XP.
C:\Windows\System32\Config\ on Windows 2000, XP.
C:\Windows\ on Windows 95, 98, ME.
C:\Windows\Profiles\ on Windows 95, 98, ME.

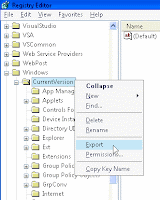
The following backup registry method is preferred if you're making changes to a specific key of the registry. To backup a selected key in the registry, you can follow these simple steps to backup the whole registry or any particular registry subkey:

• Click Start, and then click Run.
• In the Open box, type regedit, and then click OK
• Locate and then click the key that contains the value that you want to edit
• On the File menu, click Export.
• In the Save in box, select a location where you want to save the Registration Entries (.reg)
• In the File name box, type a file name, and then click Save.

Save the .REG file in a safer location in case you want to undo the registry changes made. Now that you've created a Registry backup for that particular key.
You can restore the registry backup file by just double-clicking the .REG file. It automatically merges the contents to the Registry.

How To Setting Auto Login at Windows OS

It’s not recommend to make your computer can automatically login in the local network, but sometimes it is useful to, especially as an Administrator like you. For example, if your computer had to active 24 hour in a day and running a service. In the midnight the computer is down and then automatically up after the electricity is on, the service can’t run if you are not login first. In a while you’re still slipping at your home.

Well, the thing that I can share to solve this matter is to make your computer login automatically in the local network or auto login.


  • Click start, click RUN
  • Type regedit in the text box, press enter
  • Go to: HKEY_LOCAL_MACHINE\SOFTWARE\Microsoft\Windows NT\CurrentVersion\Winlogon
  • Add String Value "DefaultUserName" fill the value data with your user name to log on
  • Add String Value "DefaultPassword" fill the value data with your password
  • Add String Value "AutoAdminLogon" fill the value data with "1"
  • Add String Value "ForceAutoLogon" fill the value data with “1”
  • Restart your computer and see the result

Don't forget to backup your windows registri before to make it change.

Good luck.